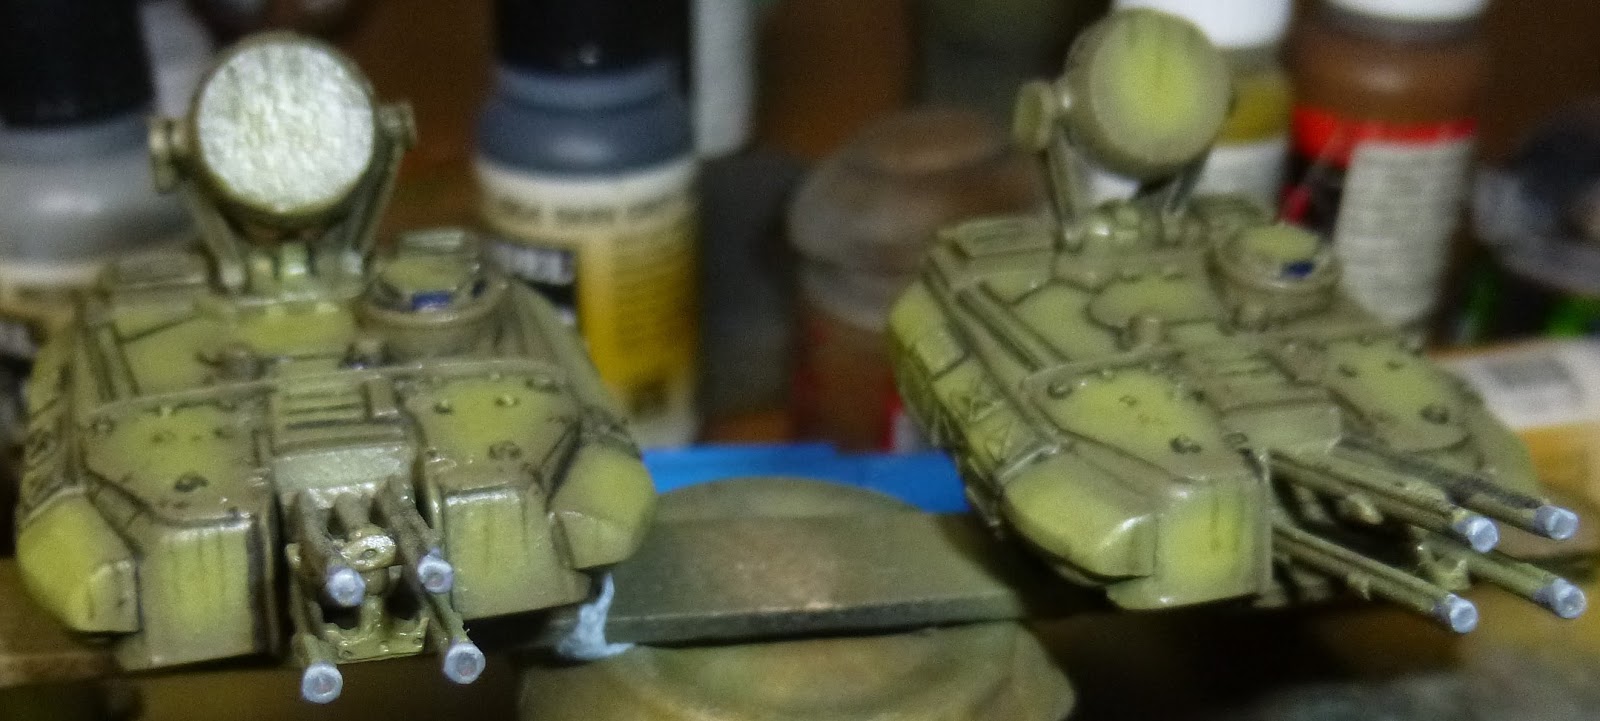
So here's the first platoon which I've done for my Soviet force. I chose to do the Shilka first as it was the most tank like of what I had, as such I could have a real play with the scheme I wanted to go across my whole army
Firstly though the quality of the model itself - the sculpt is pretty accurate having looked at a lot of Shilka's on the internet over the last few weeks, so that's good - not sure on the rivets, but that's not my thing. I has very little flash on the resin parts, and no mold lines either (a couple of small ones that were easily filed off) the tracks had a couple of bits which needed attention, but again nothing significant,
The assemble was straightforward - I was really impressed with the Radar attached very well, I was really impressed with the design for this bit as I could have seen it being really fragile, but having knocked the turrets a few times in assembly and painting I can confirm how good they are at staying in place. The rest was easy with a bit of super glue and it all went together quickly and easily.
Having scrubbed the model and built it I started the painting process by applying a black base coat - after this I applied some Mig Ammo 'Green Khaki' as the base colour - this required about three coats to get really good coverage.
I then made my first attempts at panel highlighting with some Mig Ammo 'light green khaki' - It could have gone a little better but I wasn't too disheartened, after this I picked out the details which needed a different colour, so the tracks were Vallejo Panzer Ace's 'Dark Rubber', the metal bits Vallejo 'neutral grey' (both highlighted with Vallejo 'medium sea grey') The wood on the shovel was Flat earth (highlighted with flat earth and khaki 1:1 mix) and the glass areas had some Vallejo arctic blue.
Having got all the base colours on I applied a Dark Brown Mig Ammo Filter to the model, and some track wash to the tracks. Once that had dried I then applied some Mig Ammo Black Panel line into the recess's and other appropriate places.
With that very time consuming layer done I applied some Army painter Matt Varnish and turned to starting the weathering. One of the bits I wanted to bring over from my
UAR force was the two colour streaking - I've found out how to improved applying this (and playing with it) since the early days with my
winter Finnish - So I applied streaks to vertical surfaces with the Dark streaking grime, and then with rust streaks - I found some really useful images showing how the rust streaks might not just be vertical - I really enjoyed applying these and found that by using thinners and white spirit I could get slightly different effects on the streaks which was also pretty fun to do.
With those in place I applied some Mig Ammo Damp Earth around the tracks, the hull edges etc - I didn't want the tracks caked in mud like my
French, but I wanted it to look like those and the streaks showed it had been in wet eastern Europe prepping for world war 3 - and with a final coat of varnish it's done.
As for how it plays well that's tough to really say until I get some games under my belt it has standard soviet stats - though lower assault values, it's movement and armour are what you would expect for a support vehicle, but dedicated AA and radar make it lethal against enemy air.
hope you like and it's the Hail up next.


Noice
ReplyDeleteexcellent!
ReplyDeleteVery very nice mate. Loving the rust streaks in particular and weathering.
ReplyDeleteGood job!
Love the paint job.
ReplyDeleteLovely work!
ReplyDeleteVery good painting. Going to be a nice army at this high standard. cheers
ReplyDeleteI see you've found a good use for the BJPsych at last
ReplyDeleteThese look fantastic. It's great to see some paint work on these models while the rest of us are still waiting for them. Gives me ideas.
ReplyDeleteThey look great.
ReplyDeleteDo you think the shilka will be a better AA choice than the gopher?
I think it is, and also looks better:)
DeleteGreat work, very inspiring!
ReplyDeleteperde modelleri
ReplyDeleteMOBİL ONAY
mobil ödeme bozdurma
nft nasıl alınır
ANKARA EVDEN EVE NAKLİYAT
TRAFİK SİGORTASI
Dedektor
web sitesi kurma
ask kitaplari
SMM PANEL
ReplyDeletesmm panel
İSİLANLARİBLOG.COM
İNSTAGRAM TAKİPÇİ SATIN AL
https://www.hirdavatciburada.com
https://www.beyazesyateknikservisi.com.tr
Servis
tiktok jeton hilesi
ataşehir toshiba klima servisi
ReplyDeletemaltepe daikin klima servisi
kadıköy daikin klima servisi
ümraniye toshiba klima servisi
kartal beko klima servisi
ümraniye beko klima servisi
tuzla lg klima servisi
çekmeköy beko klima servisi
ataşehir beko klima servisi